Speaking in Kode
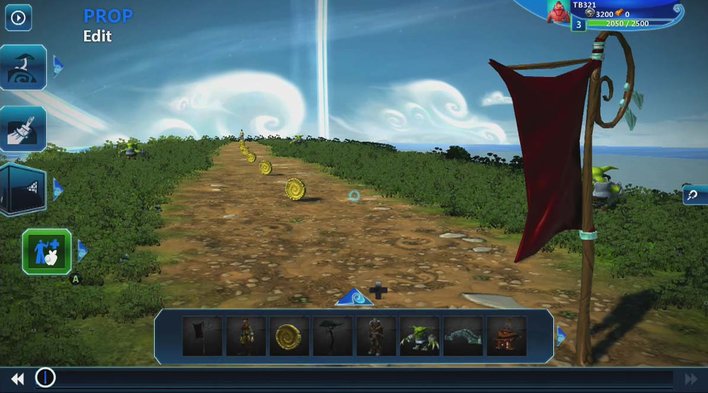
Goblins, coins and tree, as far as the eye can see
Let's recap. We've made an island, we've painted it with grass, we've made a path and we've planted a big tree for decoration. We've added coins to collect, goblins to bash and we've tried out our game using the Test function in the pause menu, before tweaking it a bit, and if you're like us, turning everything upside down. All that's left to add to our 3D platformer masterpiece is a goal.
Seeing as we're running a bit low on original ideas, we'll draw from history again for some inspiration. What did Mario always find at the end of his levels? No, not an annoying mushroom man called Toad - a flagpole. So what better random item to stick at the end of our Project Spark level?
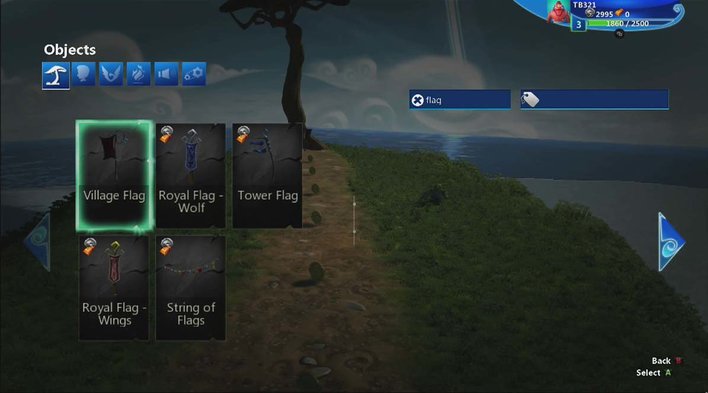
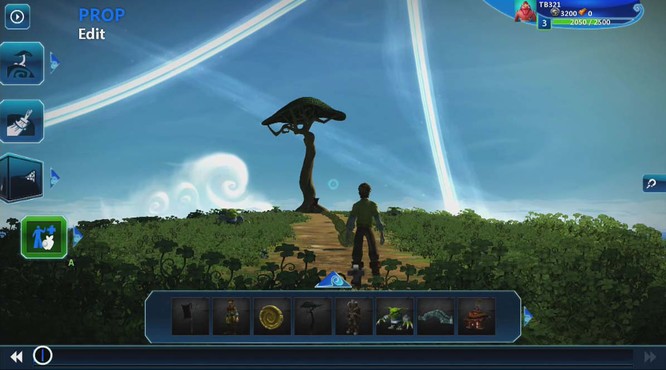
Choose the village flag, it's free!
First of all, let's put a flag of our own into the game. Again, to quickly recap, you can do this by pressing the A button to open the side menu, and scrolling your cursor down using the d-pad/left stick to the PROP option and pressing the A button again to select the Add & Edit Props tool. Then, press up on the d-pad to open the item menu, highlight the search bar and type in 'flag'. We'll use the village flag for our goal.
Place the village flag at the far end of the path, in front of the tree, like in the picture below. Don't forget the usual routine of snapping the flag using left trigger and placing it using right trigger.
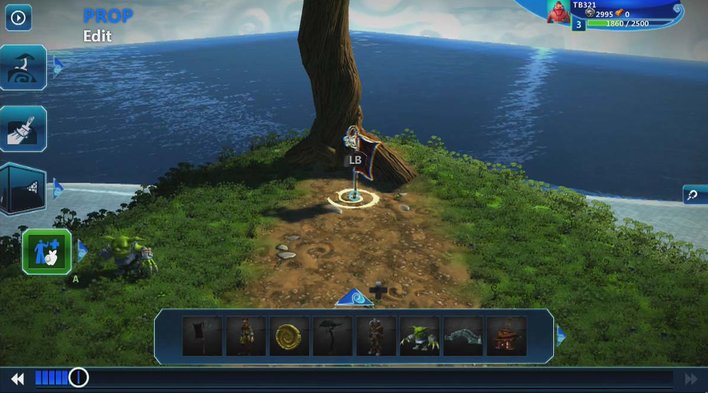
X marks the spot...well, no actually, the flag does.
Okay, so we have a flag to use as a goal, but what next? Well, we have to open up the flag's brain - yes, really! Don't worry, it's not gooey and pink - every object in Project Spark has an AI brain which can be programmed to do different things. In our case, we want to program our game to end once we touch the flag. So, move your cursor over the flag, hold left bumper and press the Y button to bring up the brain editor.
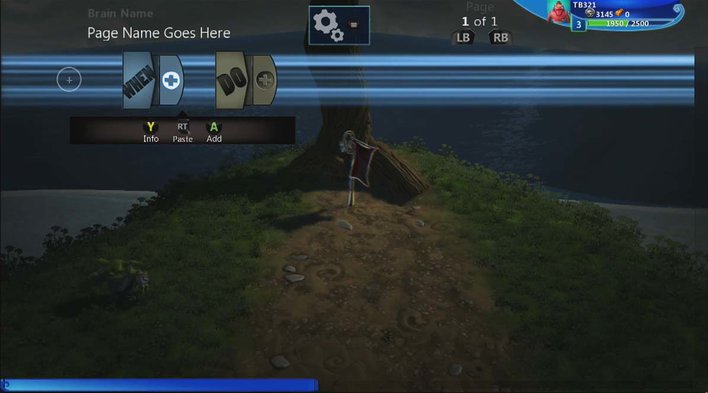
Time to open up this flag's brain for surgery...STAT!
If your blood turned to ice when you read the word program, don't worry! Project Spark uses a system called 'Koding' (woah, the crazy spelling must mean it's cool) which let's you program without having to know how to write and read proper code. You'll still have to learn how to understand the building blocks system the game uses for approaching logic, but as you'll see, it's quite straightforward.
All the programming here works as if it were one big 'if-then' statement - once you open the brain of a flag, you'll see two boxes, a blue WHEN box, and a green DO box. Essentially, this boils down to:
WHEN these criteria are met, DO this action.
If you've never dabbled in programming before, this can all sound quite complex, but it's pretty easy once you get your head around it.
So, let's think about the logic we need here. We need our flag to know when we've reached it, and when we do reach it, we need it to end the game. So, let's select the box labelled "+" on the right of the WHEN box.
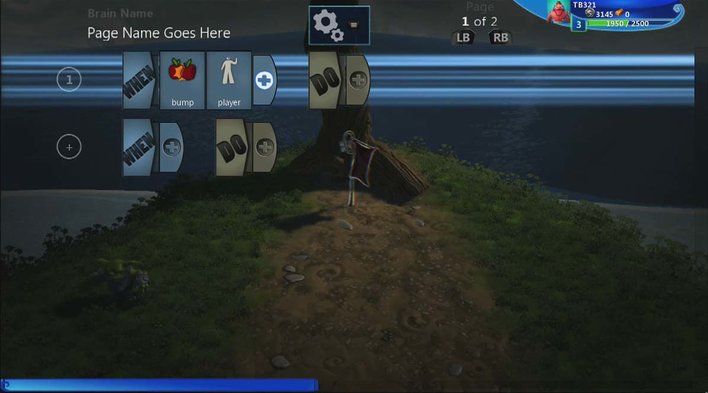
Then go to Sensors - Bump to add it to the list. Now we've told the flag to look out for something bashing into it, we need to tell it what to be looking out for. So, let's click blue + symbol again, and this time go to Objects - Player.
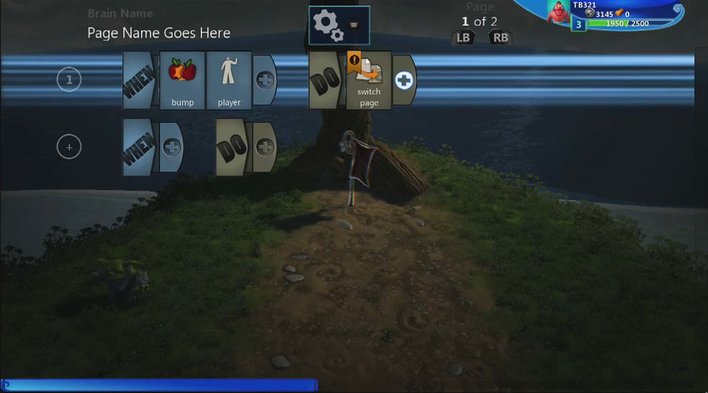
This line of Kode now means that when the player "bumps" into the flag, something happens. That "something" has to be the game realising the level's over, and the player's won. So, we move across to the + symbol next to the DO box, and press A.
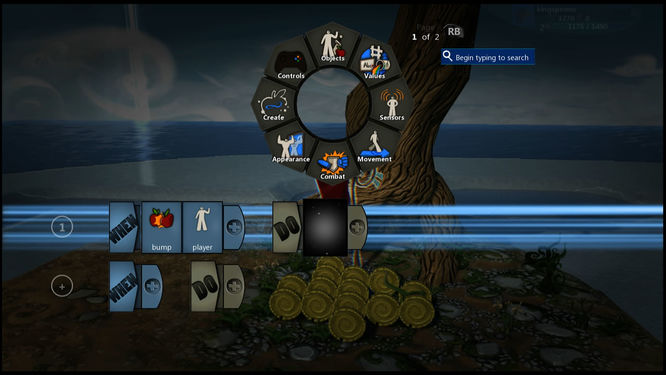
Then, press right bumper to display the second page of brain options.Select Brains - Switch page.
This basically means the game will change from one "page" of instructions to the next when you reach the flag - in our case, it'll switch to the instructions for finishing the game. An object's brain can only run one set of instructions at once - as Project Spark says in one of the tutorials, "Switching Pages is like changing states; like going from being asleep to being awake. You can't be both at once".
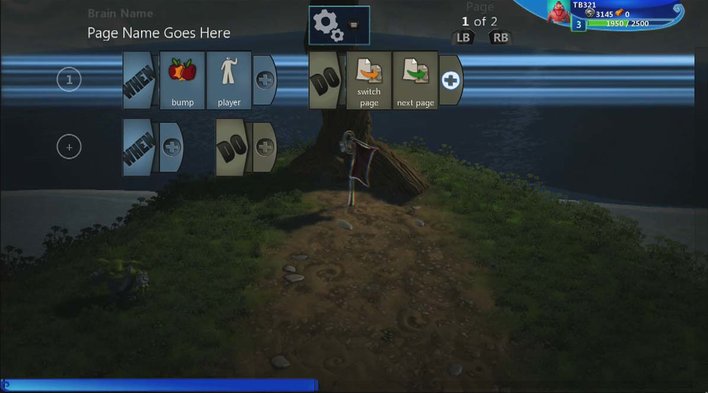
Once we've finished contemplating Project Spark's philosophical musings on the finer technicalities of the human condition, we need to again press the A button on the + symbol next to DO to tell the game which page of Kode to switch to.
Press right bumper - select Brains, and then next page. Your first brain page of Kode should look now like this:
From this screen, press right bumper to switch to the new brain page. Although it's perhaps not as obvious as it should be, your current page is displayed at the top of the screen. On this new brain page, we're going to tell the game what to do once the player reaches the flag.
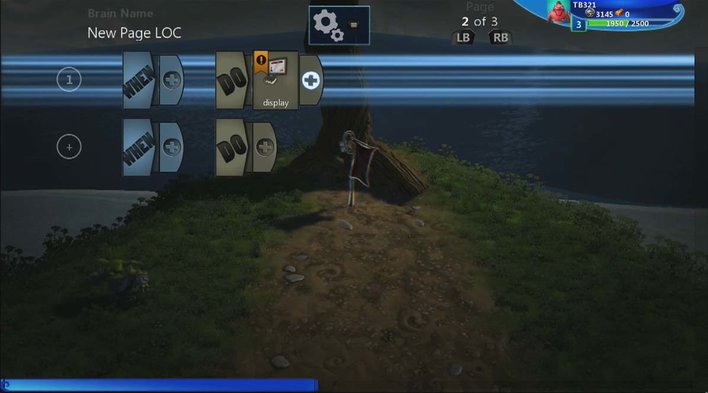
This time, instead of editing the blue WHEN side first, scroll the cursor right to the + symbol near DO and press the A button to select it. We're going to get the game to display a victory message when the player reaches the flag. Select Appearance - Display - display.
Selecting the + symbol again, go to Values - Text - new text, and enter what text you want the player to see once they reach the flag - let's go with 'Congratulations!' for our example. Press the Menu button once you're happy with your text.
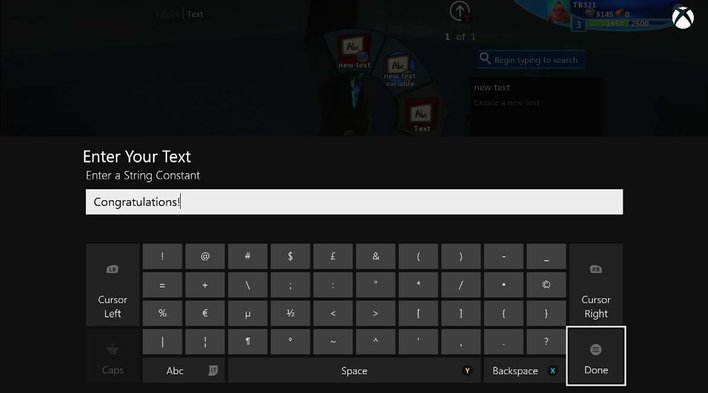
Enter your message, and press the Menu button.
Your screen will now look like this:
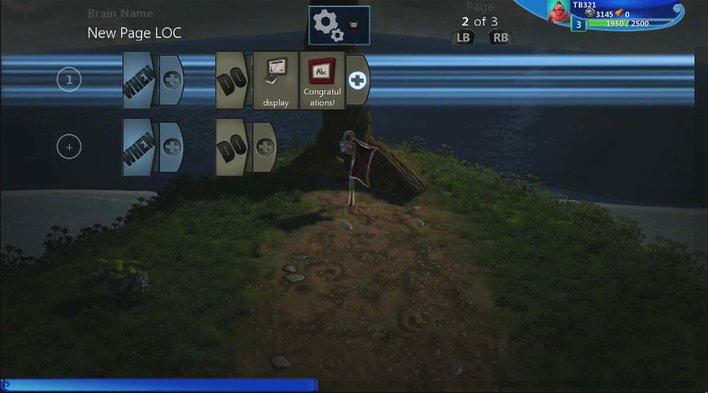
This means the game will display our message - but where?
Now we need to tell the game where to display our text when the player touches the flag. Once again, on the same line, press the A button on the + symbol near DO, and then select Modifers - Positioning - Screen Location - screen centre. Your screen will now look like this:

This line now means the game will display the text in the centre of the screen, but we're not quite done with it yet.
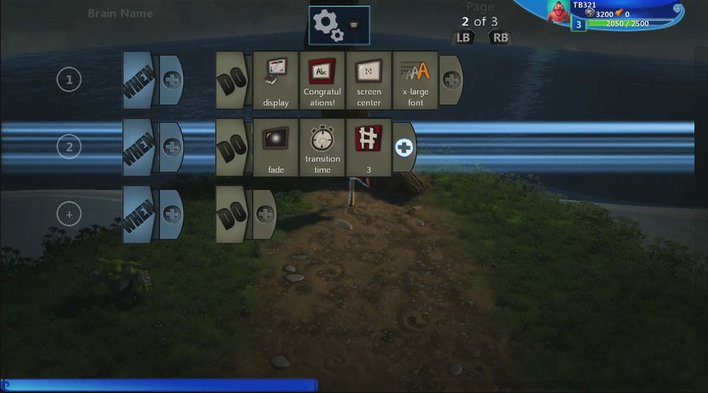
We have one more modifier to add to this line of code, and that's to tell the game what size font we want the game to display our victory message in. We want the text to be nice and big, so it's a fitting testament to the player's skill at successfully navigating the deadly goblin-infested path they've just battled their way along.
That's right, once again select the green + next to DO, and then go to Modifiers - Font Size - x-large font. You will now have a screen that looks like this:
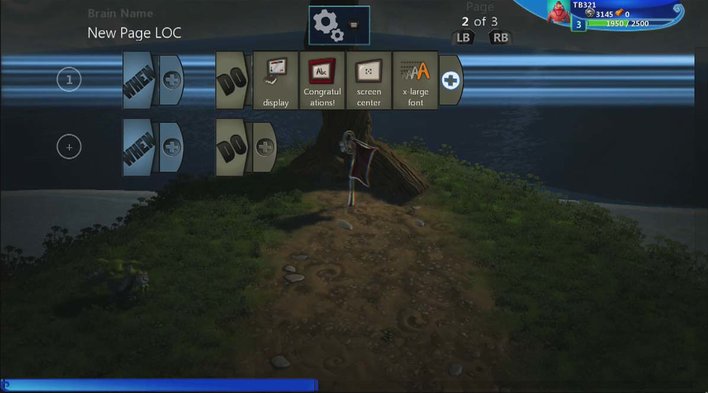
Ta-da! The full line of Kode now means that the game will display the text in the centre of the screen in extra-large font. That's this line done and dusted!
That's the first line of Kode completed on the second brain page for the flag - together with our flag's first brain page, the game will now display the victory message once the player touches the flag. We're not done yet though, as we've still got a few lines of Kode to put into this brain to get a nice flashy ending sequence.
Move the d-pad/left stick down to the second line of Kode and press the A button on the second DO+ symbol to select it.

Then select Appearance - Display - fade.
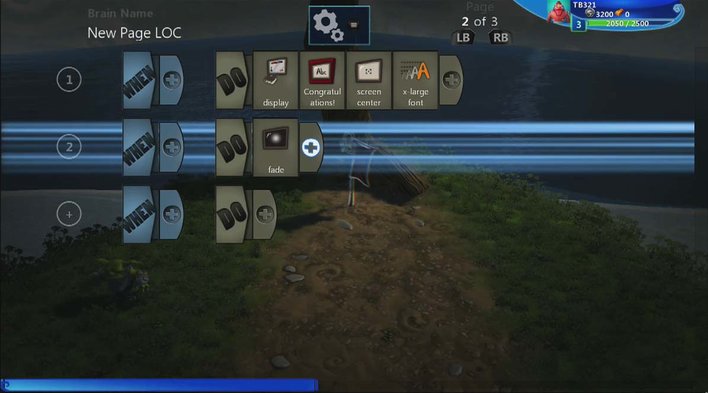
This first Kode instruction in the second line tells the game screen to fade to black.
Next, select the DO + symbol on the second line again, and this time go to Modifers - Transition Time.
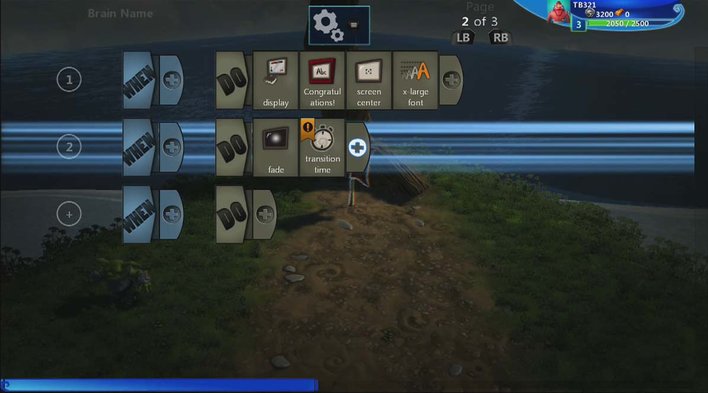
This second Kode instruction tells the game to perform the fade out gradually rather than instantly, but on it's own it won't work;we still need to tell the game how long this will take in seconds.
After that, select the DO + symbol once more for this line and go to Values - Number - new number. Now we need to enter a time value for the length of time we want the screen fade to take. Let's enter a value of '3' and then press the Menu button.
Your full second line of Kode will now look like this:
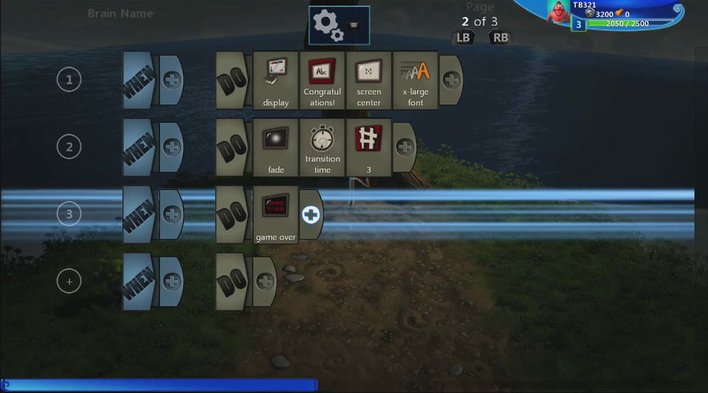
This full second line now means that the game will take 3 seconds to fade out to black once the player touches the flag. Now we're really nearly done! There's just one last line of Kode to input, and it's to tell the game to actually finish once the player touches the flag.
Move the cursor down using the d-pad/left stick and start a third line of Kode by pressing the A button on the DO+ symbol. Then, go to Appearance - Display - game over. This instruction will tell the game to end, but we also need to delay the ending so we can have chance to read the victory text.
The game over instruction ends the game, but we want it to sync up with our fadeout. We need two more pieces of Kode to get it all working together nicely.
The second to last step (very nearly done, don't worry) is to select the blue WHEN + button (still on the third line) and then go to Timing and Logic - countdown timer.
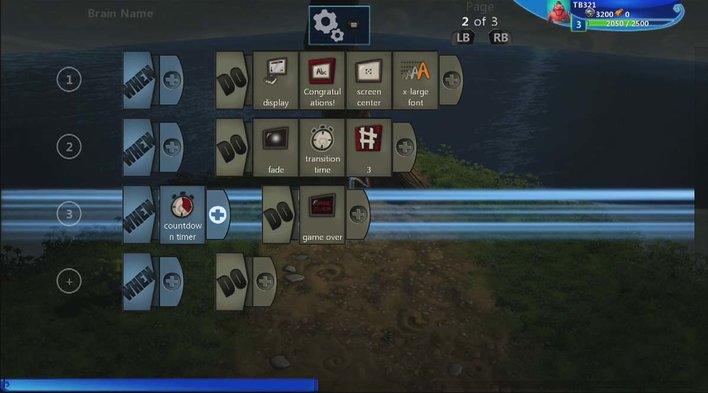
The countdown timer instruction will delay the game over so it doesn't happen immediately when the player touches the flag. We still need to tell the game how long to delay the game over for.
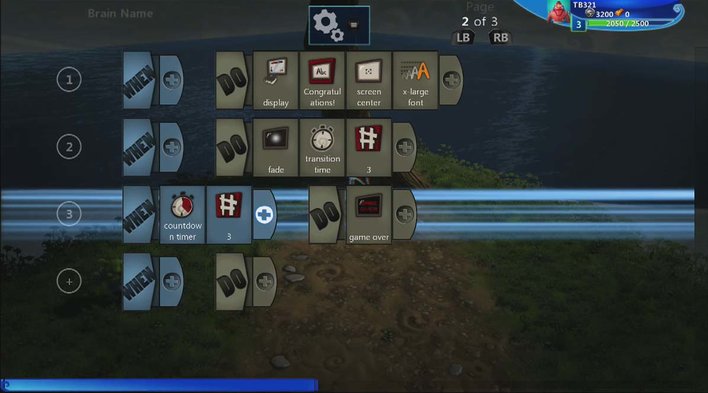
Finally, press the A button to select the WHEN + symbol one more time and then go to Values - Number - new number to enter a value for the end of game timer. Let's go with 3 again, so enter it using the virtual keyboard and press the Menu button to complete the last bit of kode for your first game.
Speaking of victory messages, congratulations! You've just successfully created your very first Project Spark game. The final page of code for the second page of your flag's now swelling brain will look like this:
Tadaa!
You're now the proud owner of the world's brainiest flag! Well done!
Head back into the game, and don't forget to save your map by pressing the Menu button and then Save, and then Save As to give your game a special name. If you're feeling particularly proud, you can even use Save + Share to upload your masterpiece onto the Project Spark servers so your friends can download and play your game too.
Most importantly though, once you're happy with your game and it's saved, go to Exit, and then select Play, and see how your first ever game all works for yourself!
Time to set out on your adventure! Have fun and thump some goblins for me! Don't forget to share your creations with your friends and see what they think of your game.
If you want to download the map we've created whilst making this guide to tweak it, remix it, or simply destroy it, then from Project Spark's main menu go to Play, then Community, and search for 'Everybody Plays Tutorial Game' in the search bar at the top right of the screen.
The steps we've gone through in this guide to make your own world are really only the tip of the iceberg. The worlds and games available to download from other Project Spark creators show off some remarkable skill and ingenuity in their design, which makes them a great place to learn new tips and tricks for your own creations. There's also in-game tutorials that will teach you how to build worlds similar to the one we've just created, as well as upcoming ones that will guide you through how to build many other types of games. New content, help, items, tools and other bits and pieces are regularly added to the game via regular updates, so you shouldn't run out of things to do or make any time soon!
We hope that this guide was helpful in getting you up and running with making your first game; perhaps it'll be the initial spark (get it?) of inspiration to get you making many, many more.